
The skinny: This program went amazingly well! We had 60 people attend, and during the activity boat building time parents were taking out their phones to take pictures of their kids and their boat creations. IT was also an incredibly cost effective program to offer.
Cost: Maybe $10. I bought 2 rolls of 180 foot aluminum foil. I also had to buy under-bed storage containers, and plastic dish wash tubs. These were about $80, but they were a one-time purchase and we can use them over and over again. I also went to the bank and exchanged $20 for pennies. If we were to do this program again, I would exchange about $30 in pennies. As the kids kept building better models of boats, they kept using more pennies and we began to run out towards the end of the night.
Prep: I pre-cut about 100 squares of tin foil roughly 12-14 inches each. I set up three tables along the center of my room and placed the under bed storage on them so that kids could walk up to them to experiment with their boats. I also had 6 tables set up around the perimeter of the room for building time.
I brought the kids into the Storytime room for a 15 minute orientation. An local college history professor talked about Columbus and the history of ships.
Then, we played a game, “Float or Won’t”. I had a whole tableful of stuff and the kids predicted whether each item would float…or won’t! I would count down, with the kids, before dropping in each item: “3…2…1…!” A teen volunteer wrote a grid on the white board, and we tracked if each item floated, or did not, and then compared the answers at the end.
The last two items I dropped in were a pipe cleaner and a marble.
- What makes an item float or sink?
- We talked about 3 reasons why objects float or sink.
- Buoyancy
- Density
- Archimedes’ Principal
Usually, we can determine if an object will float or sink based on if the object is light or heavy (buoyancy)
Buoyancy:
- Light=float=buoyant
- Heavy= sink= not buoyant
- (Show them the pipe cleaner, and the marble again)
Density:
Show them the two cups, one filled with marbles, and the other filled with pipe cleaners. Cup with marbles is more dense.
Density: The amount of stuff it has inside it, relative to its volume and size.
But…why don’t ships skink? They are really heavy!
Archimedes’ Principal:
Show them the bowl. Begin to pour in water. I had placed a line of tape around the middle of the bowl to prevent me from accidentally over-filling. I asked the kids to tell me to stop when the water reaches the line. Place in any dense object. I used a bottle of corn syrup. The water level will rise.
- What happened?
- In order to make room for the object, the water gets pushed around. It is being displaced. If the object is heavier than the original amount of water, or is very dense, the object will sink.
- Ships are heavy and large and hollow (they have lots of air so people can breathe)
- The ship is lighter than the ocean that is displaces, so it will float.
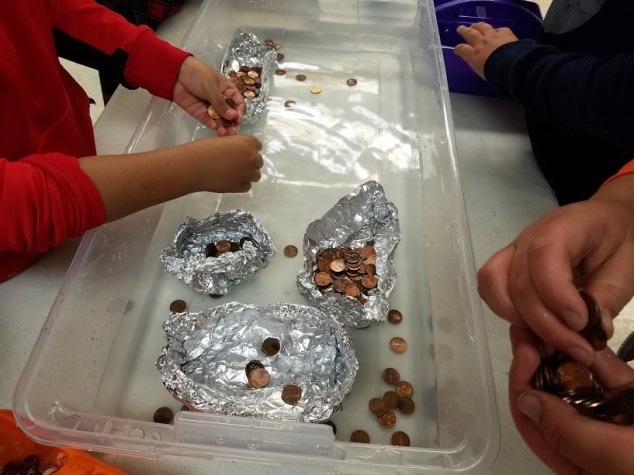
Then, I told the kids that they would be able to go to a table and take a piece of aluminum foil that I had pre-cut into about 12-14 inch squares. They could use it to make a boat. Then, they would put their boat into the water, and begin to put pennies into it. They would count, and see how many pennies they could put on their boat before it sank.
All the kids made their first boat very quickly and began to place pennies on the bottom. Most of the boats sank after only 20-30 pennies. Becuase the foil was so inexpensive, I told them they could make a few more and keep testing out new designs. At the end of the night, one of the youth built a design that held over 700 pennies!
When we were done build after about an hour, we went back into the Storytime room where we had begun, and I asked each child what their record was. I then went over the principles again on what makes an object sink or float. To end the night, I challenged any of the kids to keep experimenting at home with their parent’s permission, and to bring me in a boat they designed and tell me about it.
Resources used:
I did not use this book in our program, but I think it would be wonderful to read, at least in part to a group of students during a similar program.
–What Floats? What Sinks? A Look at Density by Jennifer Boothroyd
Youtube video: